Streamlining a Multi-Stack Monorepo Workspace with Mise
I am building a pet project called Dice Chess Lab. It is a monorepo comprising three distinct parts: a Python FastAPI backend, a Svelte frontend, and an Astro-based documentation site.
As the sole developer, I frequently switch between a MacBook Air and a Windows laptop depending on where I am. As the project grew, I began to notice a lot of friction accumulating in my daily workflow.
Eventually, I decided it was time to clean up the mess. In this article, I’ll walk through how I resolved these issues by adopting a single orchestration tool: Mise-en-place (or mise).
Juggling two laptops and three tech stacks
Before finding a better way, just starting my workday felt like solving a logic puzzle.
First, there was the Terminal Fragmentation. To simply “begin working,” I had to manually open three separate terminal windows or tabs: one to run the Python server, one for the frontend Vite instance, and one to start the documentation server. It sounds trivial, but doing this every time you switch laptops gets exhausting fast.
Second, my toolchain was scattered. Whenever I configured a new machine or performed an upgrade, I had to hunt down and install a varied stack of global tools: node, python, uv, the GitHub CLI, powershell, and pre-commit. Configuration information like version numbers was scattered across different legacy files such as .python-version and various component configs.
Lastly, the cross-platform scripting headache. Operations were segregated across the codebase. Backend tasks lived inside pyproject.toml, while the frontend used npm scripts. To make things worse, routine tasks like refreshing my local database from production meant maintaining two parallel scripts: a Bash script for the MacBook and a PowerShell version for Windows.
The Discovery: Mise
I discovered Mise-en-place. Most people know it as a fast, drop-in replacement for asdf or pyenv to manage runtimes. But as it turns out, it handles task running and workspace orchestration equally well.
The installation was straightforward using the native package managers I already use.
On macOS (MacBook Air):
1
brew install mise
On Windows:
1
winget install jdx.mise
Shell Activation
There is one critical step that many newcomers (including myself at first) miss: Shell Activation.
While mise install puts the tools on your disk, your terminal won’t “see” them automatically unless you activate Mise in your shell profile. Without this, running python --version might still show an old system version instead of the one defined in your mise.toml.
To fix this, you need to add the activation line to your shell configuration:
For macOS (zsh): Add eval "$(mise activate zsh)" to your ~/.zshrc.
For PowerShell (Windows/macOS): Add the following to your $PROFILE:
1
Invoke-Expression (& mise activate pwsh | Out-String)
Once activated, Mise becomes “invisible” — it automatically swaps tool versions in the background as you cd into different project directories.
Once installed, I stopped configuring my machines manually and started describing my entire developer landscape in a single mise.toml file at the root of my repo.
One configuration to install them all
The immediate win was defining all project tools in the root configuration. Rather than writing long setup guides in my README, I added every single workspace dependency to the [tools] section:
1
2
3
4
5
6
7
8
9
10
[tools]
node = "26"
python = "3.14"
uv = "latest"
gh = "latest"
sqlite = "latest"
gemini = "latest"
powershell = "latest"
pre-commit = "latest"
actionlint = "latest"
This completely changed how I onboard a new machine. Now, after cloning the repository, I just run:
1
mise install
Mise automatically resolves, downloads, and installs every tool listed above — from language runtimes like Node and Python to CLI utilities like gh, actionlint, and even powershell. Everything is self-contained. No separate manuals are required.
Beyond the built-in registry
At first, I assumed I was limited to tools discoverable via mise search or listed in mise registry. When I searched for Bruno — an API client I use for exploring and testing the Dice Chess API — it was nowhere to be found. I almost gave up and went back to installing it manually.
Then I discovered that Mise supports multiple backends. The github: backend can install any tool that publishes binaries as GitHub Releases. It even verifies SLSA provenance automatically when available. So adding Bruno was as simple as one extra line:
1
"github:usebruno/bruno" = "latest"
This unlocked the full picture: the built-in registry is just the starting point. In practice, the pool of installable tools is virtually unlimited.
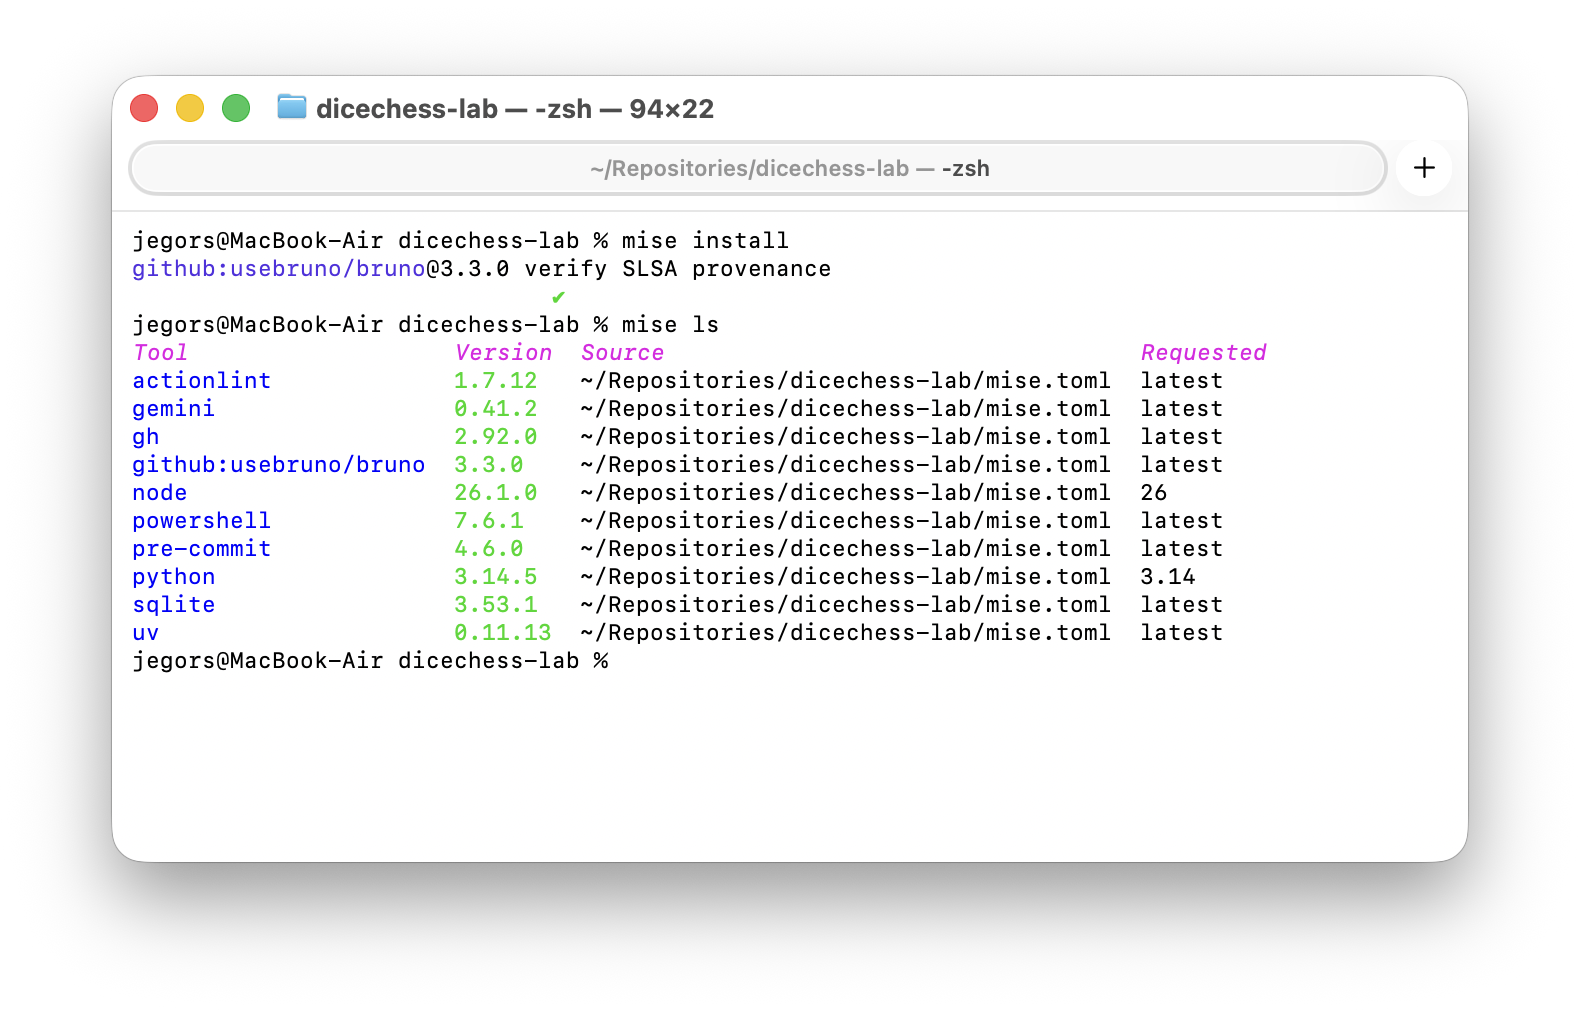 Running
 mise install provisions the entire toolchain; mise ls confirms every resolved version and its source.
Cleaning up the task running mess
Next, I tackled the fragmentation between frontend and backend environments. The end result speaks for itself — a single mise run all command now launches all three services in parallel, with color-coded output in one terminal window:
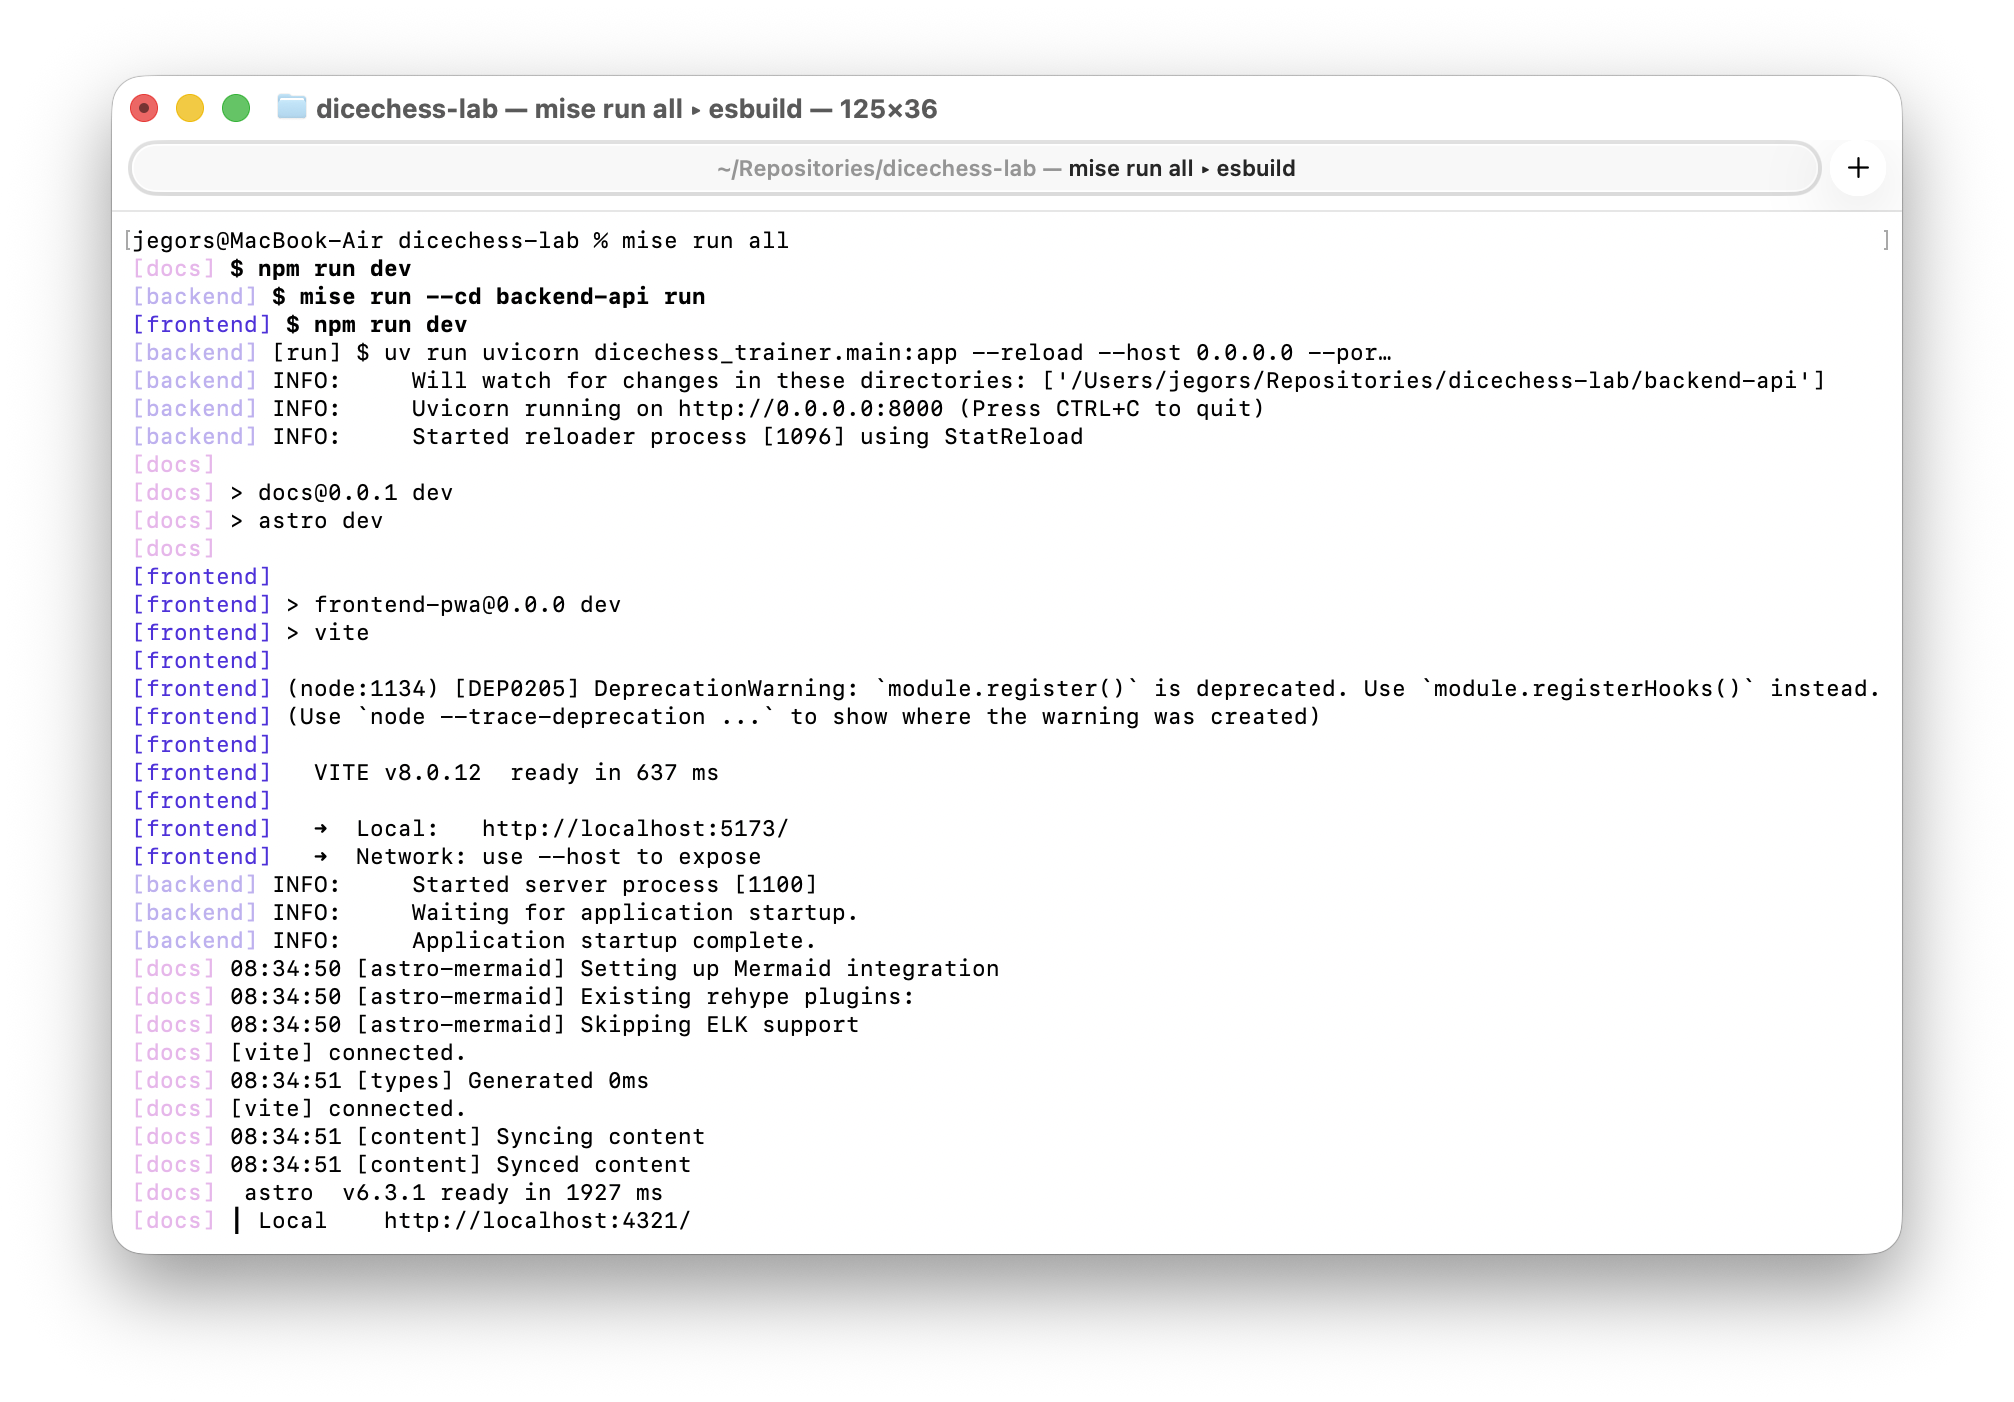 No more juggling three terminal tabs. Backend, frontend, and docs all start concurrently from a single command.
I started by decentralizing my backend dependencies. I stripped poethepoet from the core application packages and replaced it with a simple, localized mise.toml inside the backend-api/ folder. Here is a simplified excerpt — in practice, the file grew to cover formatting, type checking, complexity analysis, and more:
1
2
3
4
5
6
7
8
# backend-api/mise.toml
[tasks.test]
description = "🧪 Runs backend tests"
run = "uv run pytest"

[tasks.lint]
description = "🔍 Lints code using Ruff"
run = "uv run ruff check src"
Root Orchestration
With separate component tasks set up, I turned the root configuration file into a global dashboard. I used the --cd flag to fire component commands without actually leaving the root directory.
1
2
3
4
5
6
7
# Root mise.toml
[tasks."backend:check"]
run = "mise run --cd backend-api check"

[tasks."frontend:check"]
run = "npm run check"
dir = "frontend-pwa"
This setup made it trivial to compose powerful workflows. Running mise tasks at the root now shows a unified dashboard of every available operation across the entire monorepo:
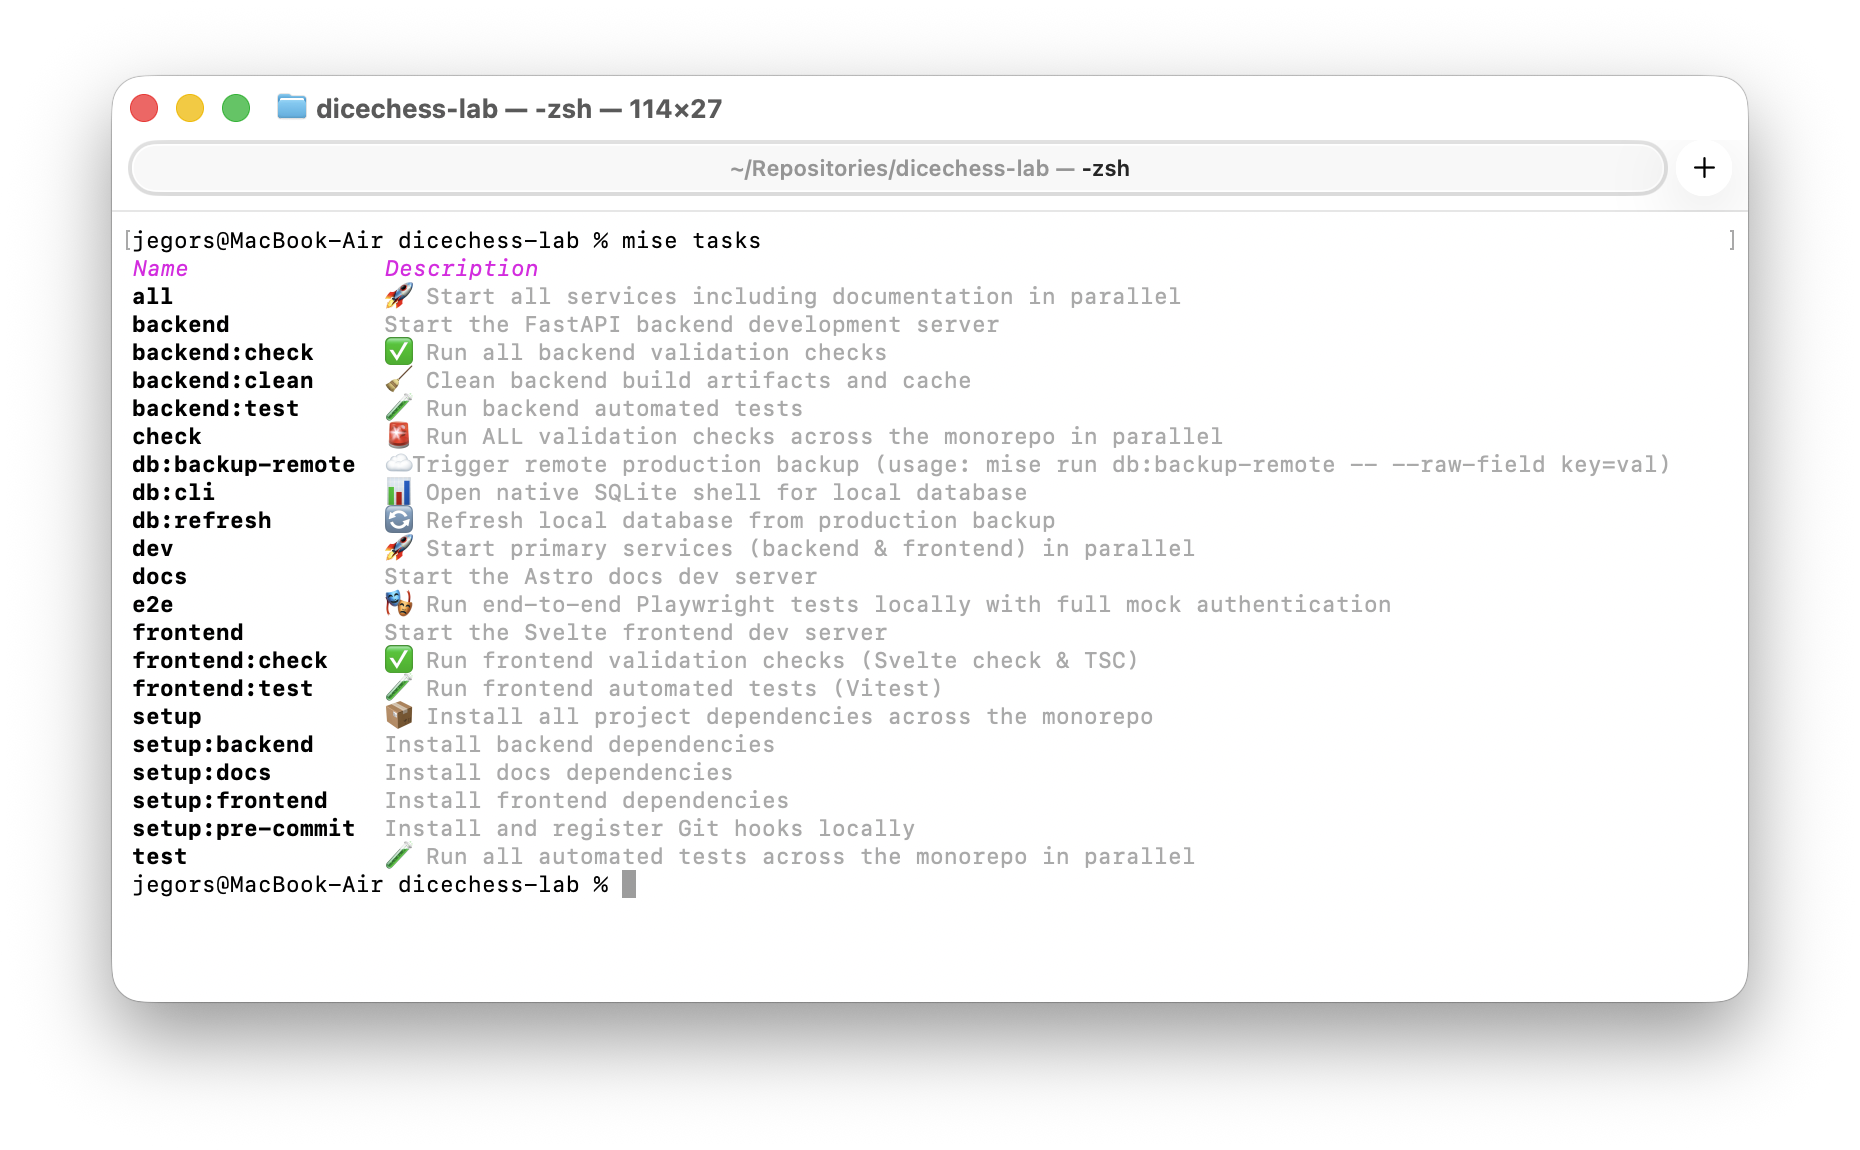 A single command reveals the full task landscape — from service control to quality checks and database operations.
For example, I created a single “Check Everything” command that fires all validation tasks across the whole ecosystem in parallel:
1
2
3
[tasks.check]
description = "✅ Run all code validation in parallel"
depends = ["backend:check", "frontend:check"]
Even my automatic Git hook registration got streamlined into the aggregate setup command using a wildcard dependency:
1
2
3
4
5
6
[tasks."setup:pre-commit"]
run = "pre-commit install"

[tasks.setup]
description = "📦 Install everything across the monorepo"
depends = ["setup:*"]
Running mise tasks deps reveals how Mise resolves these relationships into a clear dependency tree:
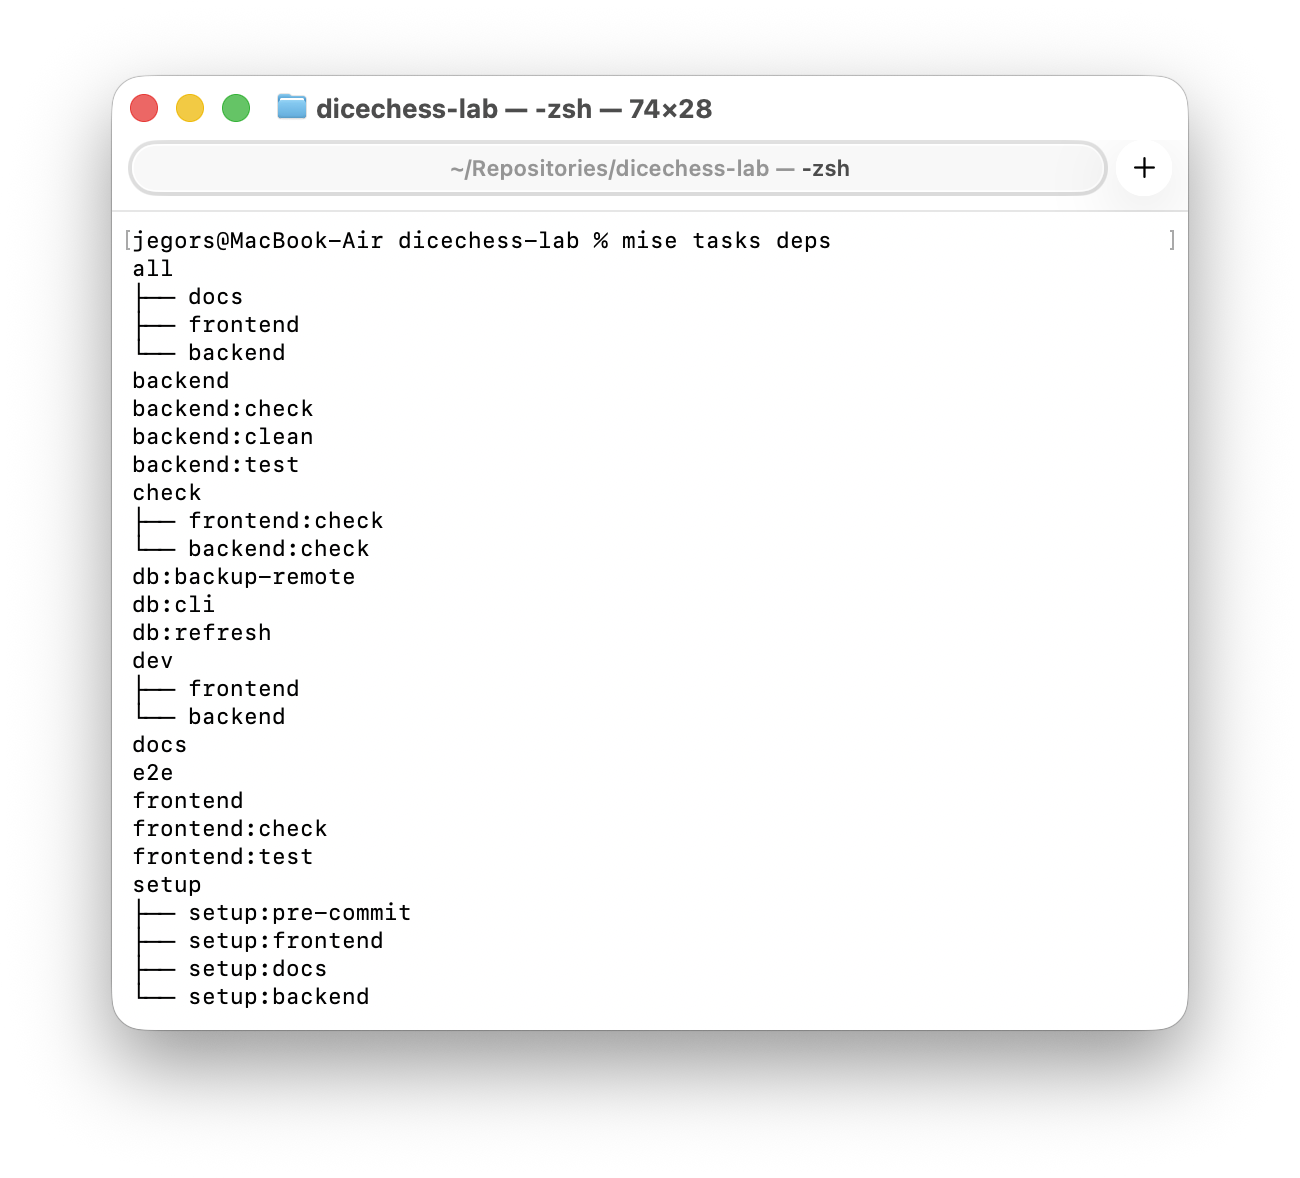 The
The setup:* wildcard automatically expands to include every matching sub-task, while composite tasks like check and dev show their parallel branches.
Standardizing on one Shell
One of the coolest side effects was integrating powershell directly into Mise’s global tools. This guaranteed that the exact same shell environment is available to me on both Windows and macOS.
Previously, pulling a database backup meant carefully syncing logic across a .sh script and a .ps1 copy. By trusting Mise to provide pwsh across the board, I killed the duplicated scripts entirely. Now I use one universal PowerShell script and execute it via a Mise task everywhere:
1
2
3
[tasks."db:refresh"]
description = "🔄 Unified Database Refresh"
run = "pwsh ./scripts/ops/refresh_local_db.ps1"
Making isolation easy
Finally, Mise is really smart about scoping environment variables to specific tasks.
For End-to-End (E2E) Playwright testing, I need to enable mock authentication to iterate rapidly without querying live cloud servers. Instead of forcing my global .env files to hold these test keys permanently, I restricted them directly to the testing command:
1
2
3
4
5
[tasks.e2e]
description = "🎭 Run local E2E Playwright tests"
run = "npm run test:e2e"
dir = "frontend-pwa"
env = { MOCK_AUTH = "true", VITE_MOCK_AUTH = "true" }
Now, executing mise run e2e fires up exactly the right context for that specific job and cleans itself up afterward.
First-Class IDE Integration
As awesome as the terminal is, sometimes you just want a visual workflow. To my delight, mise enjoys first-class citizen treatment inside modern editors.
I installed the official Mise plugin for JetBrains, and it seamlessly hooked into my environment.
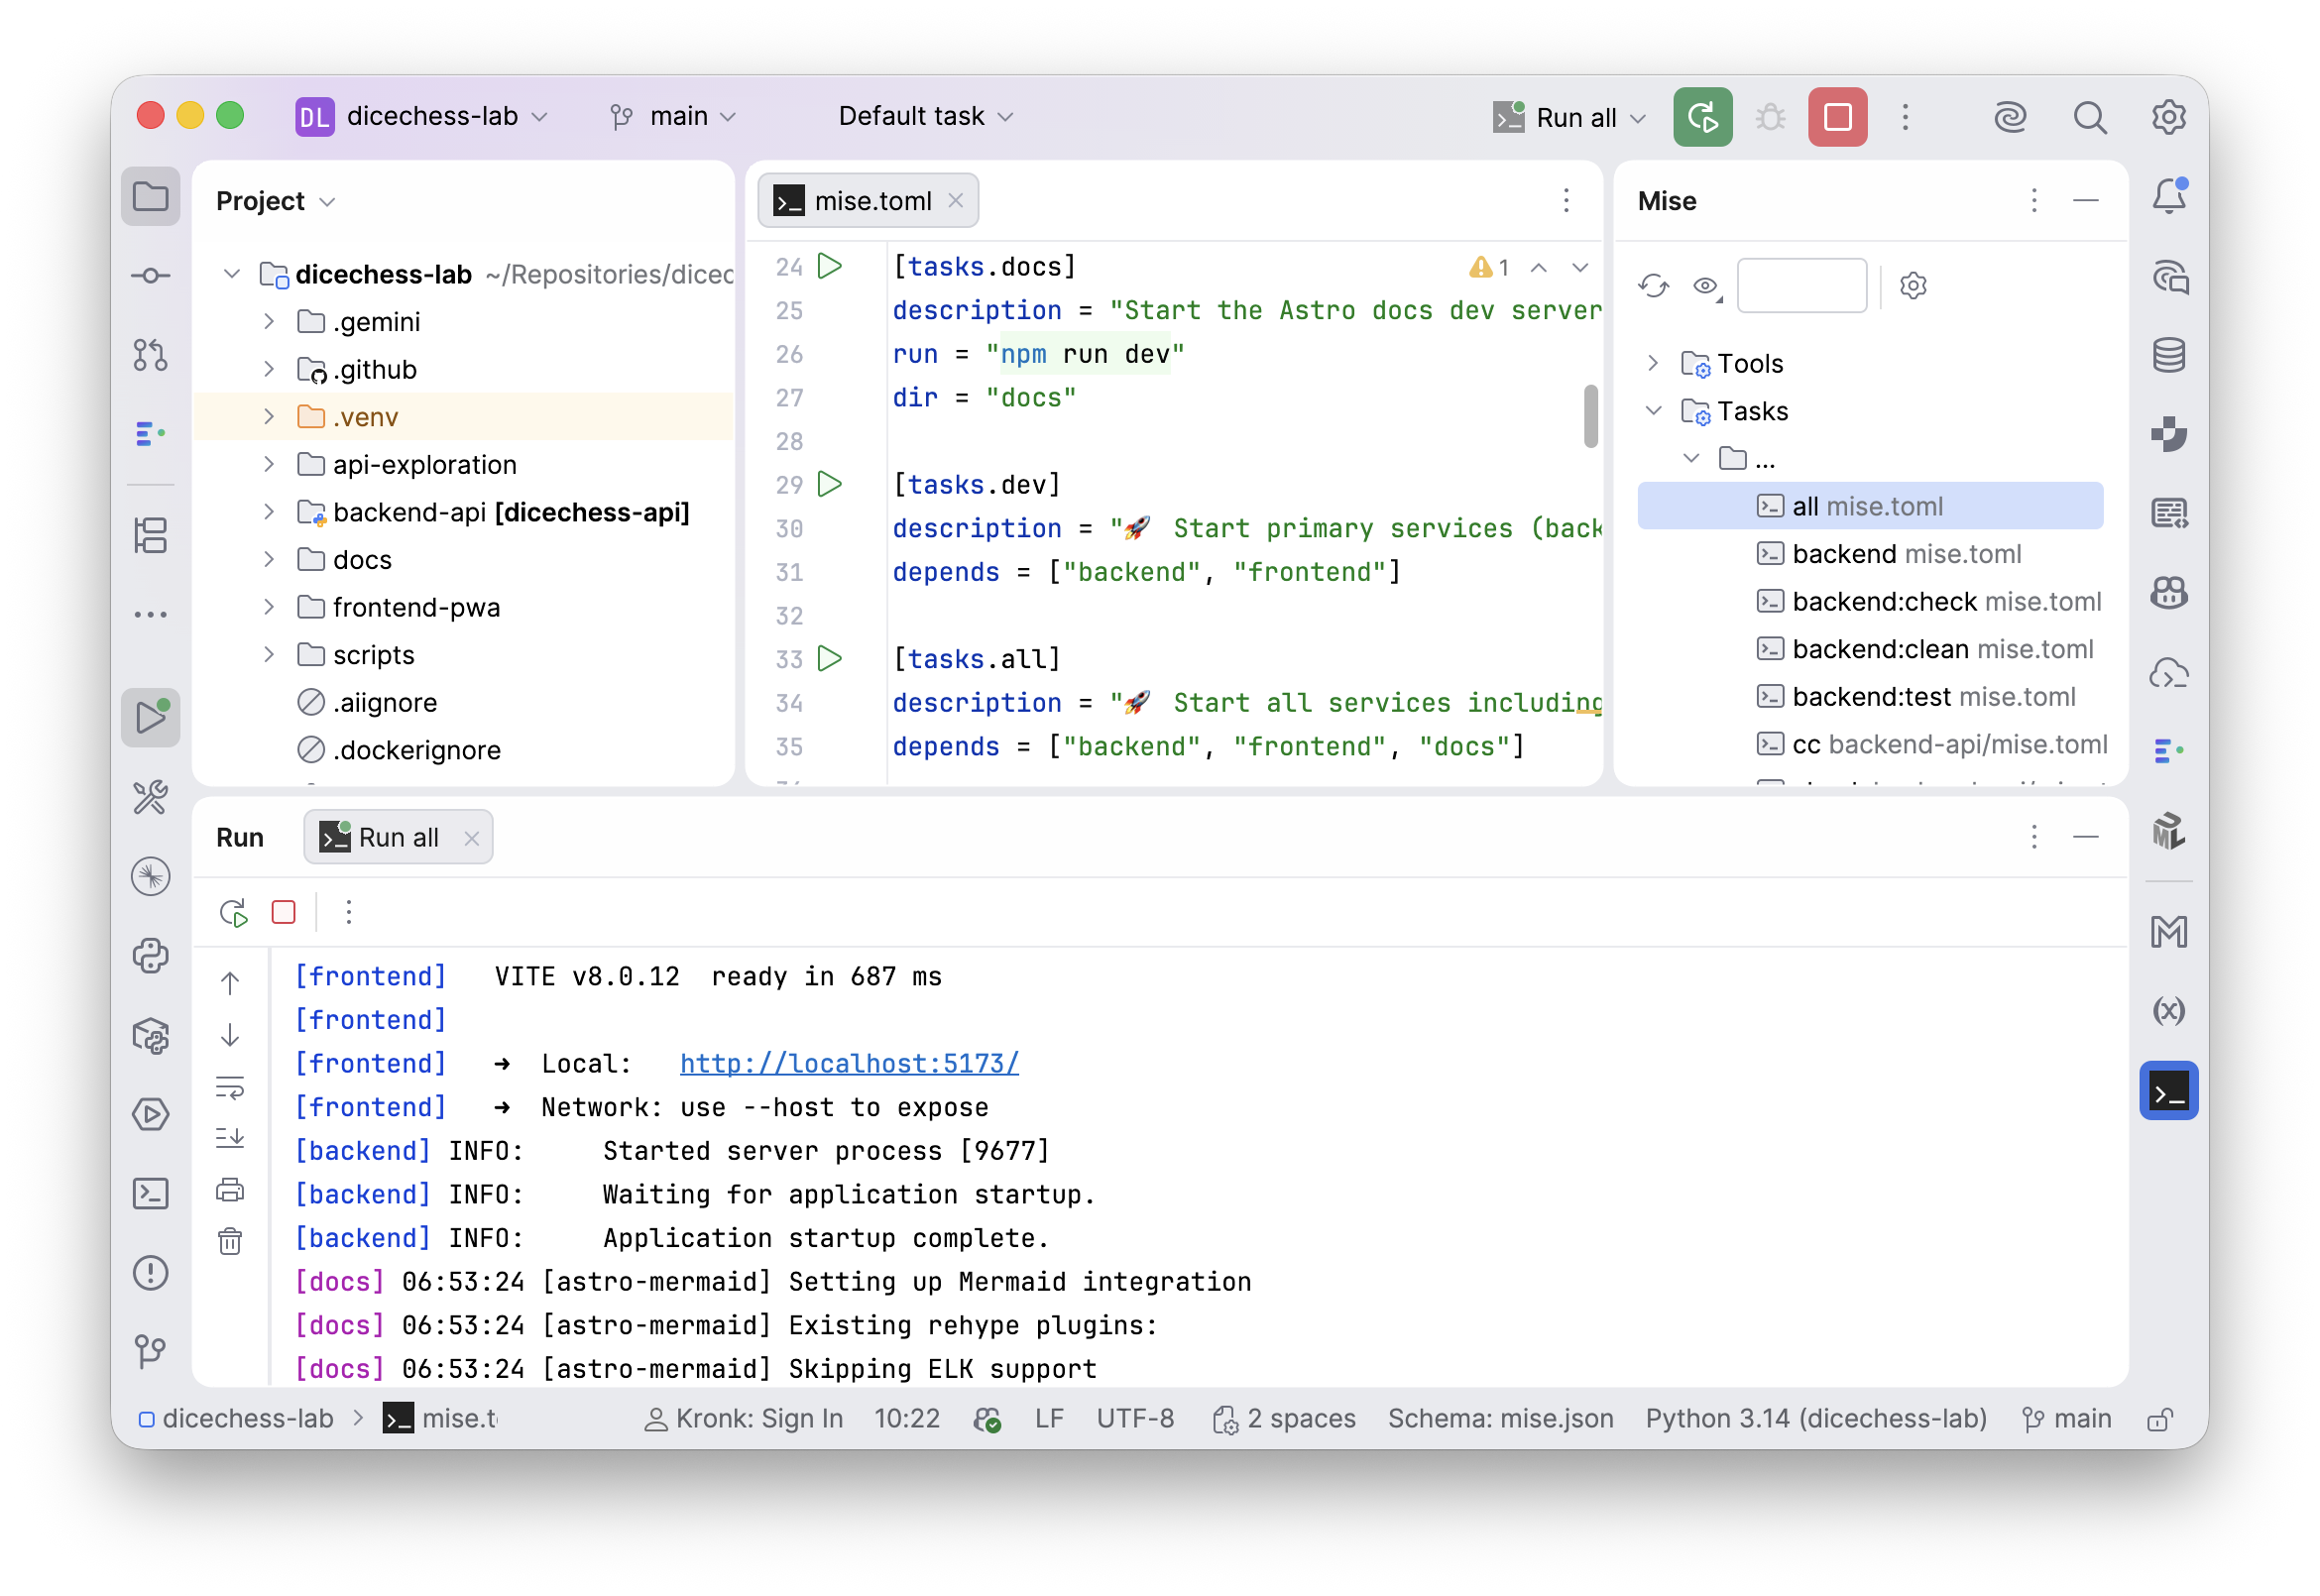 The plugin provides a dedicated Tool Window to visualize active tools, monitor running tasks, and provide deep integration with the native Run configurations system.
Right within the editor, I now have access to:
- Visual Task Runner: A dedicated pane listing all available tasks. I can trigger
mise devormise allwith a single click without leaving the IDE. - Dependency Discovery: The plugin automatically parses
mise.tomlfiles across the entire monorepo. - Visualizing the Dependency Graph (DAG): This is the “killer feature” for complex workflows. You can render an interactive flowchart of your operations. Seeing the orchestration logic of the backend, frontend, and docs laid out automatically was incredibly satisfying.
 Visualizing the inter-task dependency tree (DAG) allows instant validation of complex parallel orchestration logic.
For VS Code users, there is also an official extension offering similar functionality.
Having native editor support ensures that regardless of whether I am writing code or wiring up the environment, I never lose focus and can command my entire monorepo with visual confidence.
Conclusion
Refactoring my side project architecture to Mise cleared a tremendous amount of mental noise. I managed to unify three painful separate fronts:
- Provisioning: Installing all tools by typing one command.
- Tasks: Moving away from manual multi-terminal orchestration to smart parallel triggers.
- Consistency: Sticking to one central repository config, rather than scattered, legacy
.python-versionfragments. - Visibility: Gaining a visual, in-editor understanding of the entire orchestration graph.
If you find yourself moving between distinct environments or dealing with fractured toolchains in a pet project, giving Mise a try could be exactly the consolidation your workflow is missing.